Tim's Tips - Use of Wedges
By:
Forest Applications TrainingThe use of wedges in logging has a long history. The mechanics involved are quite simple. Depending on the height and diameter of the tree, it is possible to fell it in a direction opposite of its lean with a wedge that gives no more than one inch of lift (procedure will be explained below).
Today, most wedges are made from space-age plastics. They are light-weight and do little damage to chain teeth if the saw comes in contact with them.
The wedge is used to support the weight of the tree's trunk (bole) or limbs to keep the saw from binding or for changing the direction of fall during harvesting. The procedure is quite elementary, but can be tiring if you're not in shape!
After placing the notch in the tree's bole and setting up the hinge, the backcut is initiated (see Illustration 1). Depending on the tree's size and any immovable obstructions nearby, the backcut can be made in one cut if the tree is small or in a series of cuts if the tree's diameter is greater than the length of the chain bar on the saw.
For trees with a diameter less than the bar length, the backcut is performed in one step from the good side of the tree. Tree's with a diameter larger than the chain bar require the backcut to be made in at least two steps. Here, the backcut is initiated from the tree's bad side—When viewed from the line of fall, the bad side is the side where the tree's weighted side lean exists. It is possible to have a tree lean to one side and have the weighted lean be on opposite side because of most of the limbs are found there.—and proceeds half-way through the trunk and out the back side of the trunk (see Illustration 2). The saw is removed and the logger moves to the opposite side (good side) of the tree and continues the backcut until the tree begins to fall. If there is concern that the tree may set back on (pinch) the saw's bar and chain due to weighted side- or backlean or gusts of wind, a wedge could be set in the cut on the bad side when the logger withdraws the saw and before he moves to the tree's good side to finish the cut. The wedge does not have to be driven in too far, just enough to help support the tree's weight.
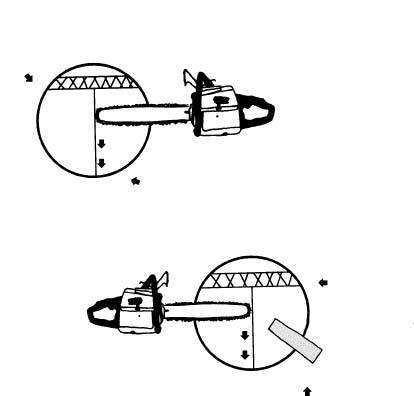
Illustration 2. The Backcut Procedure. When a back- leaning tree is large enough that the backcut cannot be made in one cut, the cut is started from the tree's bad side, works to the center and out the back. A wedge is set to keep the tree from setting back on the saw and the cut is finished from the tree's good side. The wedge is used to drive the tree over.
Wedges are commonly used on trees with backlean—lean in the direction opposite of the intended felling direction. The wedge is used as a fulcrum to lift the weighted center of the tree past the pivot point so that it will fall in the opposite direction. How large of a wedge or how many wedges it will take to overcome a tree's backlean is fairly easy to compute. While it may be possible to overcome the backlean of many trees by using a wedge, common sense should prevail. In situations where the tree has severe backlean or trees with moderate backlean that may have rotten or dotty wood inside, it would be prudent to hire a professional arborist to remove the tree.
To compute the size of the wedge or the number of wedges that must be used to overcome a tree's backlean, some information must be collected prior to initating the backcut. It is assumed that an open face notch (70 degree opening or more) and the proper size hinge for the tree will be used. The pivot point of the tree's fall is the front side of the hinge (see Illustration 1). This is the point from which the first measurement is taken. Measure from the front side of the hinge to the furthest point on the back side of tree where the saw will exit the trunk. The backcut should be level and at the same height as the base of the hinge. This is Measurement A and it should be rounded to the nearest inch (see Illustration 3).
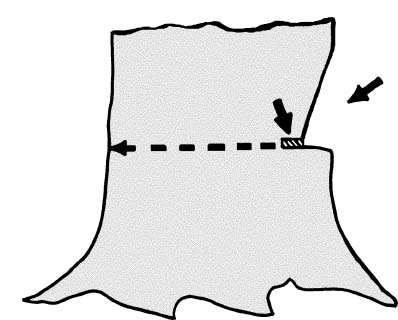
Illustration 3. To compute Measurement A, measure from the front of the hinge
to the furthest point on the back side of the trunk along the direction of the backcut.
Now, determine the total height of the tree. To do this, you will need a straight stick or rod that is equal in length to the distance between your eye and your cupped fingers when you fully extend your arm away from your body. Step away from the tree approximately 40 to 50 feet. The exact distance doesn't matter, but try to walk in a direction that will put you on the same elevation (walk the contour) as the tree's stump, and as close to 90 degrees to the direction of the tree's intended direction of fall as possible. Turn and face the tree. Now, in your mind's eye, draw an imaginary circle around the furthest reaches of the trees branches. From the center of this circle, plumb an imaginary line to the ground (see Illustration 4). Have someone mark this spot on the ground. This spot will be used to compute the tree's weighted back lean. This is the second measurement you will need to remember, Measurement B. We'll come back to this measurement shortly.
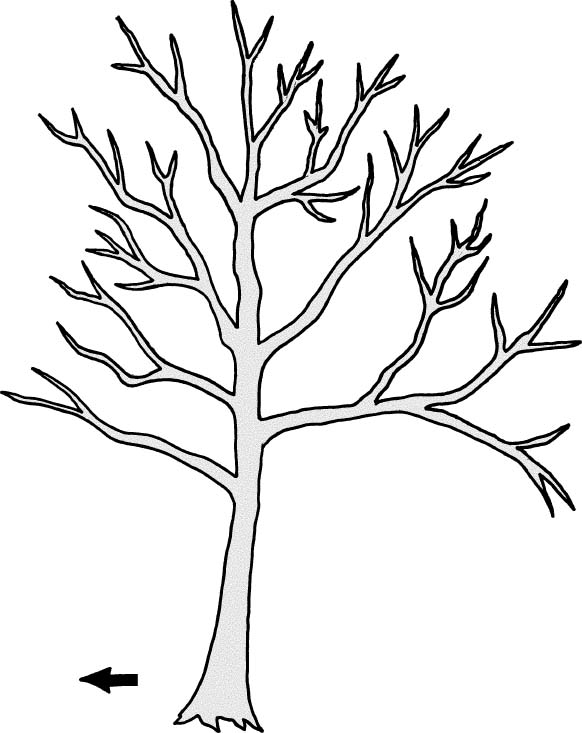 Illustration 4. Determining the amount of weighted backlean (Measurement B).
While you're still facing the tree, hold your arm-length stick or rod parallel to the tree's lean. Fully extend your arm and place the bottom of the stick at the base of the tree. The angle between your arm and the stick should be 90 degrees. Do not tilt the stick toward or away from you. Tilting the stick toward or away from you will distort the measurement and will cause subsequent calculation errors. Without moving your head, look up and see where the top of the tree intersects the stick. If the top is past the end of the stick, back up until the tree's top intersects the top of the stick. Conversely, if the top of the tree does not fully reach the end of the stick, move closer to the tree until the top intersects the top of the stick. Mark the spot on the ground where you are standing with your stick or a scuff mark in the dirt. Measure from this point back to the tree's trunk. This is the total height of the tree. This is the third measurement you will need to remember, Measurement C. (You just used the principle of similar angles, which you learned and used in geometry. What you created was a right triangle with two, forty-five degree angles. This makes the two legs of the triangle, the total height of the tree and the distance you're standing from the tree, equal.)
Now, determine the amount of backlean by measuring the distance (in inches) from the front of the hinge to the point on the ground where your helper marked the imaginary plumb line. This is Measurement B.
The next step is to determine how many segments are in the tree. One segment is equal to the first measurement you made, Measurement A. You will need to convert the total height of the tree, Measurement C, from feet to inches. To do this, multiply the total height in feet by 12, and add the remaining inches. Now, divide the tree's total height in inches (Measurement C) by the number of inches in one segment (Measurement A). This figure equals the total number of segments in the tree.
Your probably saying, I don't understand this segment thing. Well imagine a segment as a square with its sides equal to your "Measurement A" distance. If the tree has, say, 70 segments in it, imagine 70 squares stacked on top of each other laying parallel to a line running up the middle of the tree's trunk(see Illustration 5).
Illustration 5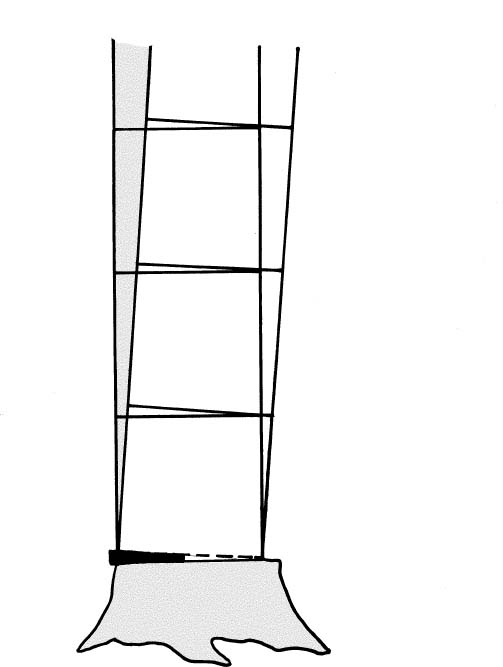
Segment 3 moves 3"
Segment 2 moves 2"
Segment 1 moves 1"
1 inch wedge
What does this tell us about the ability to wedge different size trees of the same height? Smaller diameter trees (trees with a smaller Measurement A) will have more segments and, therefore, can be wedged (lifted) further than a larger diameter tree of the same height. For example, a tree with a 6-inch base (Measurement A) that is 70 feet tall would have 140 segments, and a 70-foot tree with an 18-inch base (Measurement A) would have 46 segments. Consequently a 1-inch wedge will move the top of the 6-inch tree 140 inches, while the 18-inch tree's top will move only 46 inches using the same wedge.If you were to backcut the tree properly and insert a 1-inch (thick) wedge at the furthest back point on the stump to support the tree, you now want to know how far forward (direction opposite of tree's lean) you can move the center point of the tree's weighted backlean using this wedge. Remember—for the tree to fall in the direction opposite of it's lean, you have to move the weighted center of the tree past the pivot point (an imaginery line running vertical above the front of the hinge). If you were to drive the wedge in until it is flush with the tree's trunk, you would lift the back corner of the first segment (square) one inch. Correspondingly, this would move the opposite corner one inch toward the direction you want the tree to fall. But, how many inches did the opposite corner of the second square (segment) move? If you said two inches, you're correct. How many inches did the opposite corner of the seventieth section move toward the direction of fall? Seventy inches. Therefore, you know that in this example a one-inch wedge will lift or move the top of this 70 segment tree 70 inches in the opposite direction. If, in this example, Measurement B is less than 70 inches, only one, 1-inch wedge would be needed to lift the top of the tree past the center pivot point, thus allowing the tree to fall in the direction opposite of its lean.
You can easily determine how many wedges will be needed to overcome a tree's backlean. Using more than two wedges is not advisable for saftey reasons. If you find that you'll need two wedges to compensate for the backlean, don't stack the wedges directly one on top of the other. If you do this, striking one will cause the other one to come flying out like a guided missile possibly striking you or any object in the immediate vicinity. The wedges should be stacked on each other, but at approximately 70 degrees to each other. Alternate striking each wedge until the tree is lifted past its center pivot point and begins its fall. At that point, you should begin your retreat to a point at least 15 feet behind the stump in a direction 135 degrees away from the direction of fall.
Factsheet developed for the Illinois Pro Logger Training Series and the Game of Logging training by Michael Bolin, Extension Forester, University of Illinois Department of Natural Resources and Environmental Sciences, 1996.